Faucet Facelift: Essential Tips for DIY Replacement from Plumbing Experts
Plumbing Shreveport LA is the network of pipes and fixtures that transports water and sewage throughout a building or structure. Plumbers install, maintain, and repair these systems. They read and interpret blueprints and building codes to lay out piping systems and connect them to appliances and fixtures.
Plumbing and process piping may look similar, but they serve different purposes and have distinct regulations and needs.
A faucet is a device that controls the flow of water from a pipe or container. Sinks and bathtubs have faucets attached to them. The basic components of a faucet are the spout, handle(s), lift rod, and cartridge. There are several different types of faucets available, catering to a variety of needs and preferences.
A faucet’s spout determines how the water flows out of it, and can be either straight or curved. The height of the spout will also influence how much space is available underneath it for washing dishes and pots. Some faucets are designed with aerators, which break up the flow of water into smaller streams and add oxygen, making it easier to clean the sink.
Another feature that affects the way a faucet works is the handle’s shape and design. The most common type of faucet handle has four arms, which provide a strong grip, especially when the hands are wet or greasy. This type of faucet is particularly useful in foodservice environments, where high levels of hygiene are critical.
The valve inside the faucet controls the water temperature and flow. There are many different types of valves, including compression faucets, ball faucets, and disc faucets. Each has its own unique features and benefits, but all of them operate by opening and closing a valve. When a faucet is turned on, the handle opens the valve and allows water to flow out of the spout.
While faucets are typically mounted on the sink, some can be mounted on the wall. The choice between a deck mount and a wall mount will depend on how much space there is under the sink, and whether or not there are existing holes in the countertop or sink.
When choosing a faucet, make sure it is NSF Certified to ensure that it meets health and safety standards. This certification process involves extensive testing of the faucet’s materials, assembly, and manufacturing processes. NSF also monitors chemical and physical characteristics of the faucet to ensure that it does not contain any contaminants that could leach into the water supply.
Faucet Repair
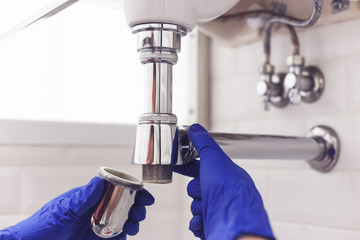
In most cases, a faucet with a leak is fairly simple to repair. First, turn off the water at the shutoff valve under the sink (or at the main line if you have one). Then remove the handle(s) and pry off the decorative cap to expose an Allen screw. Turn the screw counterclockwise to loosen and remove the handle. Next, remove the dome assembly under the handle and lift off the plastic pivot stop. Now you can see the washer and O-ring that need to be replaced. It’s a good idea to keep these parts organized as you remove them so that you can put them back in the same order when you reassemble the faucet.
Once the old washer and O-ring are replaced, put everything back together in reverse order and replace the decorative caps on the handles if necessary. Once you’ve reassembled the faucet, turn on the water and check for any new leaks (it’s a good idea to have a towel nearby in case of drips). If the problem persists, it’s probably time to call a plumber.
A cartridge-style faucet with a slow leak can usually be fixed by replacing the ceramic-disk cylinder seals. You can either purchase these separately or in a kit at a hardware store. Just make sure the replacement seals are compatible with your faucet’s design. If your leak is coming from the spout, replacing the rubber seats and springs may be enough.
If your spout is spraying unevenly or not at all, the problem may be with the aerator. This is easy to remove and clean with a screwdriver. If the spout is still leaking, you might need to replace the spout stem O-ring. A little plumber’s grease can help, but if the O-ring is cracked or worn out you’ll need to replace it. This is also the case with the ball-and-stem assemblies.
Faucet Installation
Most homeowners are warned not to attempt DIY plumbing projects, and for good reason: A few mistakes can turn a simple faucet replacement into a full-scale plumbing disaster. However, replacing a kitchen or bathroom faucet is a project that even beginning do-it-yourselfers can manage with the right preparation and tools.
The first step is to decide what kind of faucet you want, and where you want it. A deck mount, which attaches the faucet to the sink or countertop, is easiest, but it requires holes in the counter or sink. A wall-mount faucet can be more difficult to install, but it frees up space under the sink and can be easier to clean.
Next, determine if the faucet will be connected to the hot or cold water supply lines under the sink. If so, you’ll need to unscrew the nut under the sink that connects the water supply lines to the faucet. This may require a pair of adjustable wrenches. Be sure to keep one hand on the valve running into the wall to prevent it from turning while you work.
If the faucet is a newer model, it may already have the supply hoses attached. If not, you’ll need to screw them on. Be sure to use the correct size nut (generally 3/8” or 1/2”), and wrap the end of the line with plumber’s tape. You’ll also need to add a new washer to the faucet’s threaded nut, which helps ensure a leak-proof seal.
Before installing the new faucet, it’s important to get rid of any grime on the sink surface under the old one. Use a non-abrasive household cleaner and a soft cloth to clean the sink area around the old faucet. Be careful not to scratch the sink surface as you remove any old putty and debris.
Once the old faucet is removed, loosen the hold-down nuts that secure it to the underside of the sink with pliers or a special basin wrench. Undo the nut connecting the diverter valve to the sprayer hose, too. Now you’re ready to start installing the new faucet.
Faucet Replacement
Faucets of all types are meant to last for years, but there are maintenance issues (worn protective coatings) and environmental ones (hard water and buildup of mineral deposits) that cause them to fail sooner than they should. Replacing a faucet is usually an easy job, but it’s important to do your research before opening the cabinet under the sink and making a big mistake.
Start by deciding what kind of faucet you want to install. Then, choose a brand and price range that will fit your budget. You’ll also need to figure out if you have the proper materials to complete the project. Special plumber’s tools aren’t required, but you’ll need a bucket to catch any residue water and a plastic sheet to cover the floor under the sink in case of spills. A basin wrench will make it easier to take out the nut at the bottom of the old faucet that is affixed to the sink, but standard wrenches and pliers will work as well.
Turn off the water supply valves that are connected to the old faucet. Using a pair of Channellock pliers, loosen the locking nuts that hold the old faucet to the sink and remove them. Be careful when handling the hot and cold water supply lines; if they are still attached, you could be pulling out water pipes that feed other rooms in your home.
Many newer faucets include flexible tubing for the hot and cold water supply lines, but if yours don’t, you’ll need to buy them at your local hardware store. Be sure to match the threads on the ends of the tubes to those on the shutoff valves under the sink. Once you’ve got your supplies, follow the instructions that come with the faucet to install it on the sink.
While the flange that holds the faucet on the sink may be made from brass, some are made from copper or lead. If you’re installing a copper or lead faucet, apply some anti-corrosion sealant to the inside of the flange before screwing it onto the sink. Once the flange is attached, apply silicone caulk around the rim of the sink to help prevent leaks.